

Tip of the Month
Photographing Lightning
This Tip will also appear in a slightly different version on the Really Right Stuff Blog at some point, but I felt it important to post it here for the information it contains.
In reading blogs and in discussions with other photographers, there seems to be a lot of confusion about how to photograph lightning. Particularly when using a Lightning Trigger, a device that detects a change in light, which then fires a camera. Some people impart magic to the Lightning Trigger, believing that it senses a lightning bolt before it actually appears. It does not, as the text below will discuss. During the day, a Lightning Trigger could be useful, but at night photographing lightning is easy, just put your camera on Bulb until one or more bolts light up the sky. During the day, however, using Bulb isn’t an option as ambient light would overexpose the image.
Unfortunately, though, the success of using a Lightning Trigger or any other triggering device during the day depends on two factors: one, your camera must react sufficiently fast after getting the Lightning Trigger’s signal for the shutter to be open when, or if, another strike occurs; and two, another bolt or two must occur long enough after the first so that the camera’s shutter is open, otherwise the camera will only record sky. While a Lightning Trigger reacts almost instantaneously, less than a millisecond, the camera’s response time, or lag time, is much longer, and may be so long that the subsequent bolts are missed. I’ve found that a lot of photographers don’t understand this, and think that a light-detecting device can circumvent the mechanical limitations of their camera or even sense an on-coming bolt, not realizing that a trigger only fires after it detects the first bolt. A series of subsequent bolts will occur, sometimes just milliseconds apart, but the camera shutter must be open for these later bolts. Depending upon the camera, the lag time involved might be so long that that lightning event has ended before the shutter even opens.
You can prove this for yourself with a flash set on a multiple strobe setting, where a series of flashes fire in mHz fractions. When I tried capturing subsequent flashes with the Lightning Trigger, I recorded nothing. The Trigger did fire my camera when the flash sequence started, but the stroboscopic flashing was completed before my camera actually responded and the shutter opened. Some lightning bolts are like that, firing so quickly behind one another that the bolts appear as one, and even a Lightning Trigger is likely to miss those.
Next, I set my flash on manual mode at a low power ratio, so that recycling would be virtually instantaneous, and I fired the flash via the test button. Again, the Lightning Trigger fired the camera but no flash was recorded.
Now I did the same test, but instead of firing my flash only once I fired it again, as fast as I could do so, tapping the test button with my fingernail. This time, with multiple flashes occuring at a longer interval than just a mHz I did indeed capture the flash shot in the exposure. This test was representative of how a Lightning Trigger would successfully capture lightning if strikes occured in succession, even if, perhaps, your own eyes could not discern the separation of two or more strikes.
At any rate, on our recent photo tour to Yellowstone no one had a Lightning Trigger (mine was at home!) or any other detection accessory along with them, but there’s still an easy, relatively fool-proof way to record lightning, provided you remember this: shooting pixels is free! If you’re willing to shoot and to go through a lot of wasted images as you look for the keeper(s), with any luck you can photograph lightning.
Here’s how.
Set your camera to its lowest ISO and stop down your aperture to its smallest f-stop, which will give you the slowest shutter speed possible. For our lightning storm that alone gave everyone one second exposures, and some photographers used that and captured outstanding images. But there is always the risk that, at one second, the camera will be between frames when a lightning bolt occurs, so longer exposures are preferred.

If low ISOs and small apertures won’t give you a slow enough shutter speed, you can reduce the light further by using a polarizing filter, which can reduce the exposure by another two stops, or by using a 1.4X or 2X tele-converter, which will cost another one or two stops, respectively. Depending upon the tele-converter used, with a polarizer this will give you as much as a three or four stop change, so a one second becomes an eight or fifteen second exposure. Alternatively, you could also use a Singh-Ray Variable Neutral Density Filter and rotate the filter for the desired number of stops to lengthen the shutter speed. This has the added benefit in that the VNDF also reduces the amount of glass you are shooting through.
Once you’ve reduced your exposure as much as you can, simply aim at the most active area of the sky and start shooting. If you have an electronic cable release you should be able to lock it to fire continuously, in effect making a very slow speed motor drive burst. Again, I’ve seen a lot of photographers who did not know that you can fire continuously at slow speeds via a cable, just as you can with fast shutter speeds. In other words, you don’t have to be standing there pressing in the button!
Exactly what you record will still be a matter of luck, as the camera might be advancing when the best bolt appears, or you might goof and be ‘chimping’ and not shooting at the ultimate moment, or you might be greedy and go for a tight shot and have too narrow an angle of view to cover the action in the sky. That’s what happened to me, and I had only limited success in this great storm but Mary was a bit more conservative, or smarter, and captured several great shots with a wide-angle view.
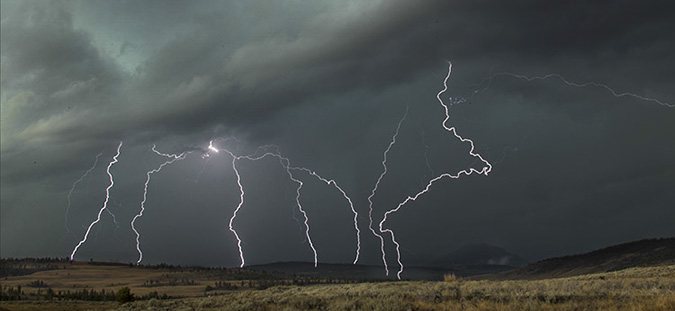
Lightning Photo by Mary Ann McDonald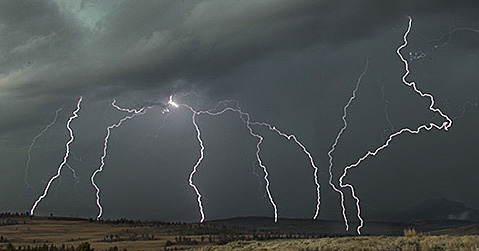


Previous Tips, July 2009 onward
Bataflae Photo Backpack
Thel Guide to Tropical Nature Photography
Essential Gear for Safaris
Take our Digital Nature Photo Course FIRST!
GPS and Home Security
Range IR Camera Remote
Gitzo Monopod 5561T Monopod
Easy Macro with Extension Tubes and Zoom Lenses
FotoSharp Camou Rain Covers
Canon 17mm T/S Lens
Locking Button for the Canon 7D
NIK HDR Program
Silver Efex Pro for Black and White Images
Beware the DELL Software Solution Rip Off
How and What We Pack for Trips
Canon Digital Learning Center
The Movie Mode with the Canon Mark IV
Batch Renaming in Bridge and CS5
Alternate Uses of some Bogen Products
Hoodman Products
Using High ISO and Live View for Focusing in Dim Light
Art Print Scams for Hungry Photographers
Hungry Vultures ruin vehicles in the Everglades
Use a Short Lens for Depth of Field
Get Professional Help!
Mini-Molar Bag
Access America Trip Insurance
Bogen Base for Macro Work
Archived Tips of the Month
prior to July 2009
Most of my original Tips of the Month for the last several
years are available through this link. Warning - some of the links are broken, so some are not available at this time. Also, the 'look' is from my
original web site, although if I ever have enough time I might redo these pages to match the new web site But that's not a high priority.
Check out our latest website,
mcdonaldwildlifephotos.com
where we'll be adding portfolios and eventually building up
a searchable data base for photo buyers. We've just started,
and the selection is limited, but it is still worth a visit!
Office Phone: (717) 543-6423
Or FAX us at: (717) 543-5342
Tip of the Month
Photographing Lightning
This Tip will also appear in a slightly different version on the Really Right Stuff Blog at some point, but I felt it important to post it here for the information it contains.
In reading blogs and in discussions with other photographers, there seems to be a lot of confusion about how to photograph lightning. Particularly when using a Lightning Trigger, a device that detects a change in light, which then fires a camera. Some people impart magic to the Lightning Trigger, believing that it senses a lightning bolt before it actually appears. It does not, as the text below will discuss. During the day, a Lightning Trigger could be useful, but at night photographing lightning is easy, just put your camera on Bulb until one or more bolts light up the sky. During the day, however, using Bulb isn’t an option as ambient light would overexpose the image.
Unfortunately, though, the success of using a Lightning Trigger or any other triggering device during the day depends on two factors: one, your camera must react sufficiently fast after getting the Lightning Trigger’s signal for the shutter to be open when, or if, another strike occurs; and two, another bolt or two must occur long enough after the first so that the camera’s shutter is open, otherwise the camera will only record sky. While a Lightning Trigger reacts almost instantaneously, less than a millisecond, the camera’s response time, or lag time, is much longer, and may be so long that the subsequent bolts are missed. I’ve found that a lot of photographers don’t understand this, and think that a light-detecting device can circumvent the mechanical limitations of their camera or even sense an on-coming bolt, not realizing that a trigger only fires after it detects the first bolt. A series of subsequent bolts will occur, sometimes just milliseconds apart, but the camera shutter must be open for these later bolts. Depending upon the camera, the lag time involved might be so long that that lightning event has ended before the shutter even opens.
You can prove this for yourself with a flash set on a multiple strobe setting, where a series of flashes fire in mHz fractions. When I tried capturing subsequent flashes with the Lightning Trigger, I recorded nothing. The Trigger did fire my camera when the flash sequence started, but the stroboscopic flashing was completed before my camera actually responded and the shutter opened. Some lightning bolts are like that, firing so quickly behind one another that the bolts appear as one, and even a Lightning Trigger is likely to miss those.
Next, I set my flash on manual mode at a low power ratio, so that recycling would be virtually instantaneous, and I fired the flash via the test button. Again, the Lightning Trigger fired the camera but no flash was recorded.
Now I did the same test, but instead of firing my flash only once I fired it again, as fast as I could do so, tapping the test button with my fingernail. This time, with multiple flashes occuring at a longer interval than just a mHz I did indeed capture the flash shot in the exposure. This test was representative of how a Lightning Trigger would successfully capture lightning if strikes occured in succession, even if, perhaps, your own eyes could not discern the separation of two or more strikes.
At any rate, on our recent photo tour to Yellowstone no one had a Lightning Trigger (mine was at home!) or any other detection accessory along with them, but there’s still an easy, relatively fool-proof way to record lightning, provided you remember this: shooting pixels is free! If you’re willing to shoot and to go through a lot of wasted images as you look for the keeper(s), with any luck you can photograph lightning.
Here’s how.
Set your camera to its lowest ISO and stop down your aperture to its smallest f-stop, which will give you the slowest shutter speed possible. For our lightning storm that alone gave everyone one second exposures, and some photographers used that and captured outstanding images. But there is always the risk that, at one second, the camera will be between frames when a lightning bolt occurs, so longer exposures are preferred.
If low ISOs and small apertures won’t give you a slow enough shutter speed, you can reduce the light further by using a polarizing filter, which can reduce the exposure by another two stops, or by using a 1.4X or 2X tele-converter, which will cost another one or two stops, respectively. Depending upon the tele-converter used, with a polarizer this will give you as much as a three or four stop change, so a one second becomes an eight or fifteen second exposure. Alternatively, you could also use a Singh-Ray Variable Neutral Density Filter and rotate the filter for the desired number of stops to lengthen the shutter speed. This has the added benefit in that the VNDF also reduces the amount of glass you are shooting through.
Once you’ve reduced your exposure as much as you can, simply aim at the most active area of the sky and start shooting. If you have an electronic cable release you should be able to lock it to fire continuously, in effect making a very slow speed motor drive burst. Again, I’ve seen a lot of photographers who did not know that you can fire continuously at slow speeds via a cable, just as you can with fast shutter speeds. In other words, you don’t have to be standing there pressing in the button!
Exactly what you record will still be a matter of luck, as the camera might be advancing when the best bolt appears, or you might goof and be ‘chimping’ and not shooting at the ultimate moment, or you might be greedy and go for a tight shot and have too narrow an angle of view to cover the action in the sky. That’s what happened to me, and I had only limited success in this great storm but Mary was a bit more conservative, or smarter, and captured several great shots with a wide-angle view.
Lightning Photo by Mary Ann McDonald
Previous Tips, July 2009 onward
Bataflae Photo Backpack
Thel Guide to Tropical Nature Photography
Essential Gear for Safaris
Take our Digital Nature Photo Course FIRST!
GPS and Home Security
Range IR Camera Remote
Gitzo Monopod 5561T Monopod
Easy Macro with Extension Tubes and Zoom Lenses
FotoSharp Camou Rain Covers
Canon 17mm T/S Lens
Locking Button for the Canon 7D
NIK HDR Program
Silver Efex Pro for Black and White Images
Beware the DELL Software Solution Rip Off
How and What We Pack for Trips
Canon Digital Learning Center
The Movie Mode with the Canon Mark IV
Batch Renaming in Bridge and CS5
Alternate Uses of some Bogen Products
Hoodman Products
Using High ISO and Live View for Focusing in Dim Light
Art Print Scams for Hungry Photographers
Hungry Vultures ruin vehicles in the Everglades
Use a Short Lens for Depth of Field
Get Professional Help!
Mini-Molar Bag
Access America Trip Insurance
Bogen Base for Macro Work
Archived Tips of the Month
prior to July 2009
Most of my original Tips of the Month for the last several
years are available through this link. Warning - some of the links are broken, so some are not available at this time. Also, the 'look' is from my
original web site, although if I ever have enough time I might redo these pages to match the new web site But that's not a high priority.
Check out our latest website,
mcdonaldwildlifephotos.com
where we'll be adding portfolios and eventually building up
a searchable data base for photo buyers. We've just started,
and the selection is limited, but it is still worth a visit!
Office Phone: (717) 543-6423
Or FAX us at: (717) 543-5342